How to Repair a Wetsuit: Fix Tears, Holes & Seams Yourself
It happens faster than you think: while hastily pulling the suit up, a fingernail digs into the material, and suddenly there’s that little crescent-shaped cut on your thigh. If you want to repair your wetsuit, you’re then faced with the question: glue it yourself, take it to a repair shop or just ignore it?
The good news: many typical kinds of damage can be fixed yourself with a little patience and the right adhesive. The less good news: small tears grow if you leave them, and the wrong glue often makes things worse.
We at FlipSoc show you which damage you can repair yourself, how to go about it step by step, when a specialist repair shop is the better choice – and why your donning technique is the biggest lever for avoiding damage in the first place.
In short: You repair small tears in a wetsuit with neoprene cement (contact adhesive): open up the tear, apply a thin coat to both sides, let it dry off, apply a second coat, press together and leave to cure as specified by the manufacturer. Larger holes and open seams need a patch, seam tape or a specialist repair shop. Superglue and household glue are unsuitable.
What wetsuit damage can you repair yourself?
You can repair small cuts and tears yourself, for example from fingernails, as well as small holes and short glued joints that have come apart. Large tears, damaged zippers and long open seams, on the other hand, call for a patch, seam tape or a specialist repair shop.
| Damage | Typical cause | DIY repair? | Method |
|---|---|---|---|
| Fingernail tear (crescent-shaped cut) | Tugging when putting it on | yes | Neoprene cement |
| Small hole (up to a few millimetres) | Stones, reef, Velcro | yes | Neoprene cement, possibly a small patch |
| Short glued seam that has come apart | Ageing, pulling at edges | yes, with care | Neoprene cement |
| Larger tear or hole | Fall, snagging | to some extent | Neoprene patch inside and cement |
| Open stitched seam | Strain, age | to some extent | Seam tape or specialist repair shop |
| Faulty zipper | Salt, sand, force | usually not | Specialist repair shop |
Important up front: if your suit is still under warranty, check the manufacturer’s terms first. In that case, you shouldn’t carry out some repairs yourself so as not to jeopardise your claims.
Which glue is suitable for neoprene?
Only special neoprene cement is suitable for neoprene – a contact adhesive that stays elastic after curing and moves with the material. Superglue and household glue are unsuitable because they become hard and brittle and split open again the next time the material stretches.
Contact adhesive works differently from most household glues: you apply it to both surfaces, let it dry off until it no longer feels wet, and only then press the surfaces together. The bond forms when the two layers of adhesive make contact.
When buying, look for an adhesive explicitly intended for neoprene and stick to the working and curing times on the pack. Neoprene cement often contains solvents – so work in a well-ventilated room or outdoors and keep away from open flames.
How do you repair a tear in a wetsuit?
To repair a tear in a wetsuit, open it up, apply a thin coat of neoprene cement to both edges of the tear, let it dry off, apply a second coat and then press the edges firmly together. After that, the cement has to cure completely.
What you need
- Neoprene cement (contact adhesive)
- Small brush, spatula or toothpick for applying it
- Clothes pegs or small clamps
- If needed, a piece of cardboard or film so nothing sticks to the surface underneath
- Clean cloth and fresh water
Step-by-step guide
- Prepare the suit: rinse the suit with fresh water and let it dry completely. Salt, sand and moisture prevent a good bond.
- Open up the tear: fold the material so that the tear opens and you can easily reach both cut surfaces. Hold it in this position with clothes pegs.
- First coat of cement: apply a thin coat of neoprene cement to both edges of the tear. Don’t smear it onto the outer surface, only into the tear.
- Let it dry off: let the cement set until it no longer feels wet. The time is on the pack – often a few minutes.
- Second coat: apply another thin coat and let it dry off again. The first coat soaks into the material; the second creates the actual bond.
- Press together: release the fold and press the edges of the tear exactly onto each other. Press firmly for a moment without shifting them.
- Let it cure: leave the suit undisturbed until the cement has cured as specified by the manufacturer – often several hours up to 24 hours. Don’t stretch or wear it during this time.
A cleanly glued fingernail tear is then barely visible and usually holds for a long time. Still, check the spot now and then after the first few sessions.
How do you patch a larger hole?
To patch a larger hole, glue a suitable neoprene patch on from the inside and also join the edges of the hole with neoprene cement. The patch absorbs the pulling forces that glue alone couldn’t withstand.
- Cut a piece of neoprene of similar thickness and with a similar surface, clearly larger than the hole on all sides, with rounded corners.
- Apply a thin coat of neoprene cement to the patch and the inside of the suit in the area to be glued, let it dry off, apply a second coat and let it dry off again.
- Position the patch precisely and press it on firmly.
- Also join the edges of the hole on the outside with cement, as with a tear.
- Let it cure completely.
A patch makes the area a little stiffer. In areas under heavy strain such as the shoulders or armpits, this can be a nuisance – here, a trip to a specialist repair shop is often worthwhile.
What should you do if a seam has come open?
If a seam has come open, you can close short glued sections with neoprene cement and reinforce them from the inside with seam tape; longer or stitched seams belong in a specialist repair shop. On a wetsuit, seams aren’t just stitched but usually glued and sometimes sealed as well.
On many suits, the neoprene edges are first butt-glued and then blind-stitched, meaning the needle doesn’t go all the way through the material. If this construction comes apart, glue alone often isn’t enough for a lasting fix. Seam tape on the inside or professional re-stitching gives the area the stability it needs.
Especially at the crotch, under the armpits and at the shoulders, a specialist repair shop is worth it, because these areas are under heavy strain with every movement.
What mistakes should you avoid when repairing?
The most common mistakes when repairing neoprene are the wrong glue, a wet suit and too little patience while it cures. If you watch out for these three points, you’ve already avoided most problems.
- Superglue or household glue: goes hard, cracks and can damage the neoprene.
- Gluing damp material: the bond won’t hold.
- Too thick a layer of cement: cures unevenly and forms hard ridges.
- Not letting it dry off: contact adhesive needs the waiting time, otherwise no firm bond forms.
- Wearing it too soon: the cement has to cure completely as specified by the manufacturer.
- Ignoring the tear: small tears get bigger every time you put the suit on.
With suits that have smoothskin or open-cell surfaces, the material is more delicate and the repair more demanding. What sets these materials apart is explained in our article on smoothskin, open-cell and lined neoprene.
Why does most damage happen when putting the suit on?
Most damage happens when putting the suit on, because you pull hard on edges, cuffs and seams and your fingernails dig straight into the material. In the water itself, on the other hand, the strain on the suit is usually even.
Almost everyone knows the typical scenarios: the suit sticks to your sweaty calf, you dig your fingertips deep into the material and pull – and your nail cuts a half-moon into the neoprene. Or you tug at the ankle cuff until the seam gives way. A suit that’s too small makes the problem worse, because the material clings more strongly to your skin. How to find the right size is explained in our guide to wetsuit size and fit.
Prevention: how to protect your wetsuit when putting it on
- Short fingernails: the simplest and most effective protection against crescent tears.
- Grip with your fingertips or a flat hand: never claw into the material with your nails.
- Small sections: push the material up gradually from the bottom up instead of pulling at the edge.
- Jewellery and watch off: rings and watch clasps cut into neoprene.
- Use a mat: stones and gravel damage knees and booties.
- Reduce friction: a donning aid, a sock or a bag helps at the cuffs.
You’ll find the detailed technique in our guide to putting on a wetsuit.
How FlipSoc protects your wetsuit from tears
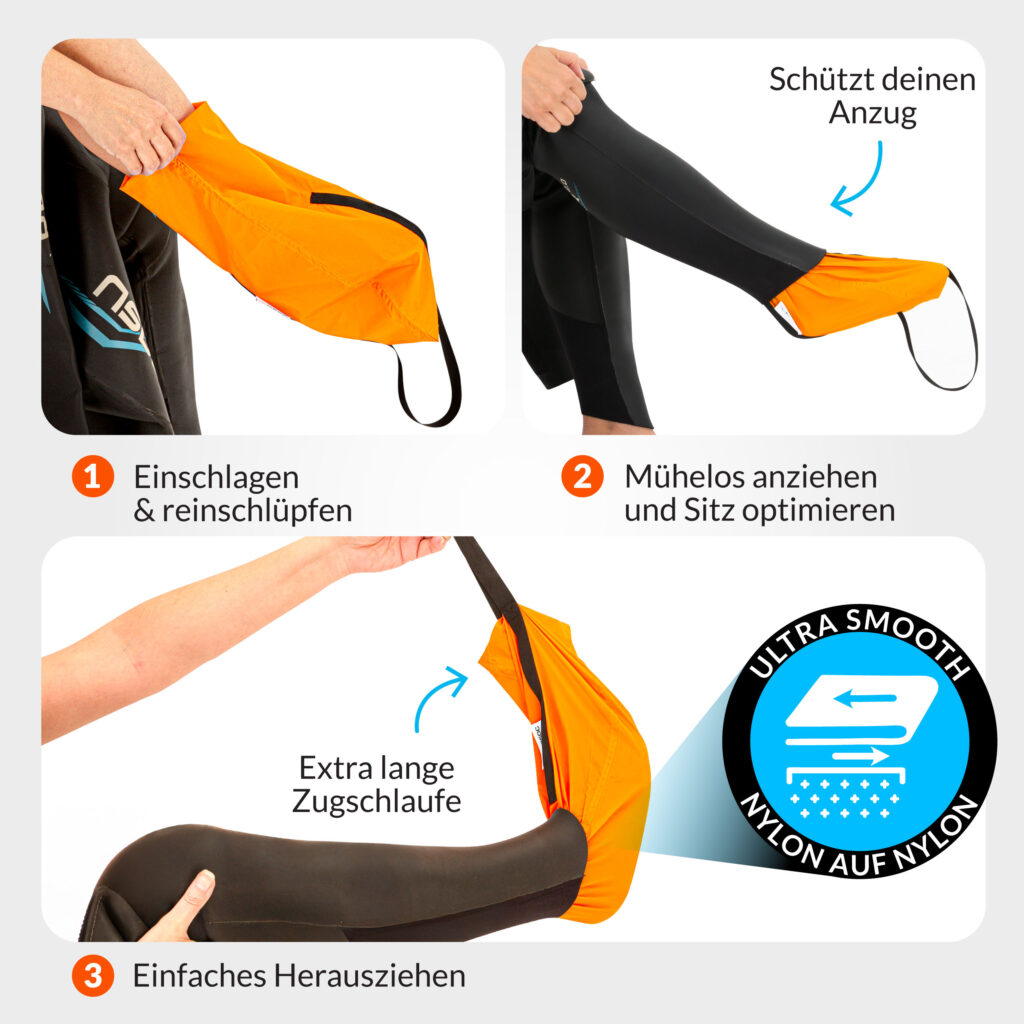
The ankle and wrist cuffs are where the most tugging happens when putting on a suit. That’s exactly where the FlipSoc comes in: you pull this donning aid made of smooth ripstop nylon over your foot or hand, slip into the leg or sleeve, and the neoprene glides through the cuff instead of sticking to your skin.
Less sticking means less tugging – and therefore less strain on seams, less abrasion and fewer chances for fingernails to dig into the material. A plastic bag can have a similar effect, but it’s single-use and tears easily. The FlipSoc is reusable, works wet or dry and is suitable for classic jersey-lined suits – fabric on the inside – of all thicknesses. It isn’t suitable for smoothskin or open-cell suits.
And because your donning aid should also last a long time, the FlipSoc comes with a 5-year guarantee: 2 years statutory warranty and a 3-year voluntary durability guarantee after a one-time registration.
Frequently asked questions about repairing a wetsuit
Can I repair a wetsuit with superglue?
No, superglue is unsuitable for neoprene. It cures hard and brittle, splits open again when stretched and can damage the material. Only use special neoprene cement.
How long does neoprene cement take to dry?
That depends on the product; full curing typically takes several hours up to 24 hours. Follow the instructions on the pack. Only wear the suit once the cement has fully cured.
Is it worth repairing a small tear in a wetsuit?
Yes, absolutely. Small tears get bigger every time you put the suit on and can later only be repaired with more effort. An early repair with neoprene cement takes just a few minutes of work plus curing time.
When should I take my wetsuit to a specialist repair shop?
A specialist repair shop is worthwhile for long open seams, large tears, faulty zippers and damage in high-strain areas such as the shoulders, armpits or crotch. They can re-stitch, apply seam tape and fit suitable patches. If your suit is under warranty, contact the manufacturer first.
How do I prevent fingernail tears in my wetsuit?
Keep your fingernails short and, when putting the suit on, grip with your fingertips or a flat hand rather than your nails. Push the material up in small sections instead of pulling at the edges. A donning aid also reduces tugging at the cuffs.
Conclusion
Repairing a wetsuit is very doable for small tears and holes: a dry suit, neoprene cement, two thin coats and patience while it dries off and cures. For major damage, open seams and zippers, a specialist repair shop is the better choice. Superglue and household glue have no place on a wetsuit.
Even better than any repair is avoiding damage. Most tears happen when putting the suit on – with short nails, the right technique and good wetsuit care, your suit will last much longer.
If you want to stop tugging at the cuffs in future, try the FlipSoc as a donning aid for your wetsuit – reusable, with free shipping and free returns within 14 days.